Thursday, December 8, 2011

I Like Bananas, Bananas Are Good: Caramel Banana Panna Cotta

So I've been on a banana milk kick lately. If you don't know what it is I suggest you go to a nearby Korean supermarket and buy some. I can't really describe it, not really banana tasting (unless it's in an artificial way) but it's very creamy and not cloyingly sweet.

Panna Cotta (side)

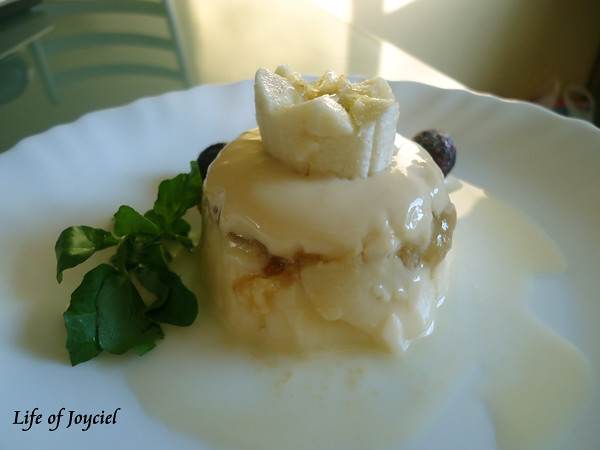
So panna cotta is good because it's just pretty much all banana milk but in a different state. Banana and caramel are lovely together so I added some caramelized bananas to add some other flavours as well as a different texture. Then for the top layer I added an evaporated milk. Evaporated milk have a more sweet and really complex flavour that tastes soooooooooo much better than regular milk (but is very fatty) so I added a small layer of it.

Caramel Banana Panna Cotta
Serves: 5 cups

Ingredients:
Banana: 1
Banana milk: 300ml (1 1/2 boxes)
Evaporated milk: 80ml
Gelatin: 5g (almost a pack, 2 teaspoons?)
Sugar: 1/2 cup
Evaporated milk: 80ml + 1/4 cup (um...makes more sense in context)

Instructions:

Evaporated Milk and Banana Milk Layers
Blooming Gelatine
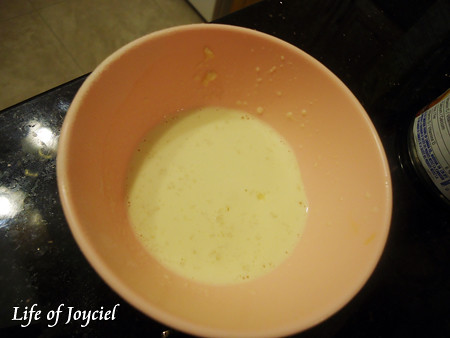
1. First, add 1g (1/2 teaspoon?) of the gelatin and mix with 25ml of the cold evaporated milk, let it bloom for 5-10 minutes.
Evaporated Milk
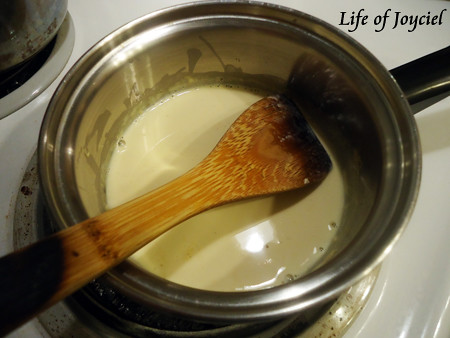
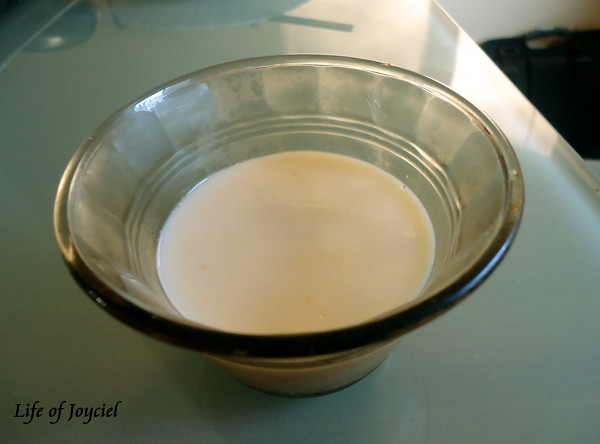
2. After, heat up 55 ml evaporated milk, when it starts to boil, add the gelatin mixture and mix until all dissolved.
Assembling 1
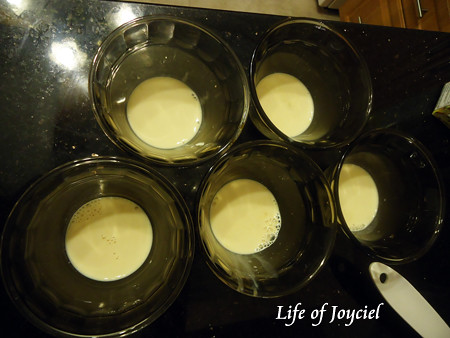
3. Pour a thin layer to each cup evenly (you can use any small cups, I only had these jello ones but a ramekin also works), put in fridge.
4. Now repeat with the banana milk. Add 4 grams of gelatine to 100 cold banana milk ad let it bloom.
5. Heat up the rest of the banana milk and then add the gelatine mixture until everything is dissolved.
6. Let it cool.

Caramelized Bananas
Sugar
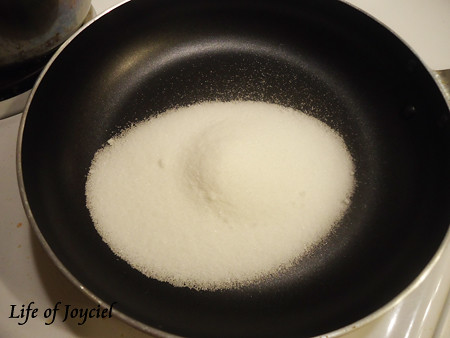
1. Add the sugar to the pan, turn to medium heat.
Melting Sugar
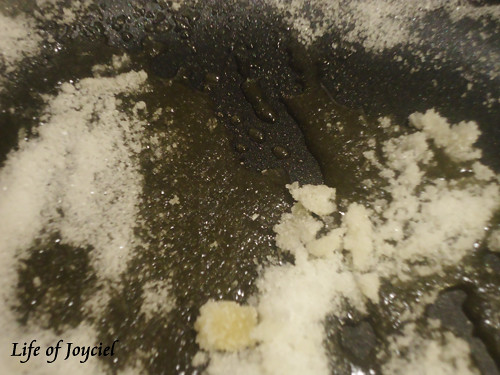
2. When it starts to melt, turn down to low heat, stirring constantly. DON'T GET DISTRACTED!
Caramelizing Sugar
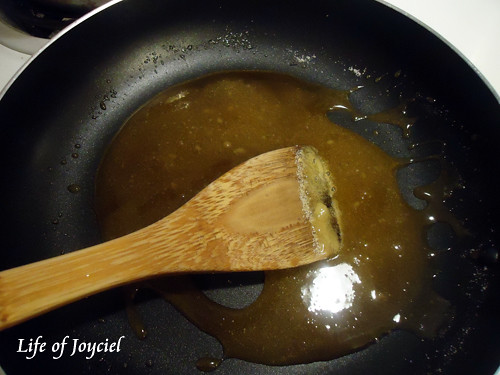
3. When it gets to this colour, add the 1/4 cup of evaporated milk.
Caramelized bananas
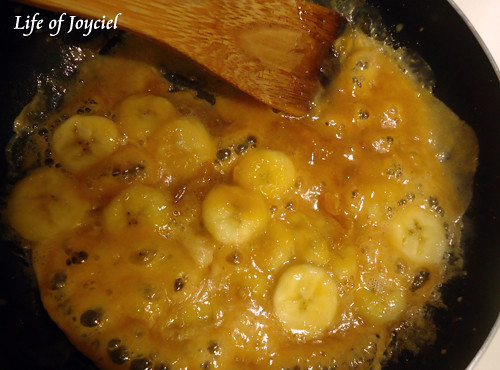
4. Add the bananas and turn up to medium heat and cook until bananas are soft.
5. When the bananas are soft, put it on a silicone mat or a piece of parchment paper to cool down.
Assembling 2
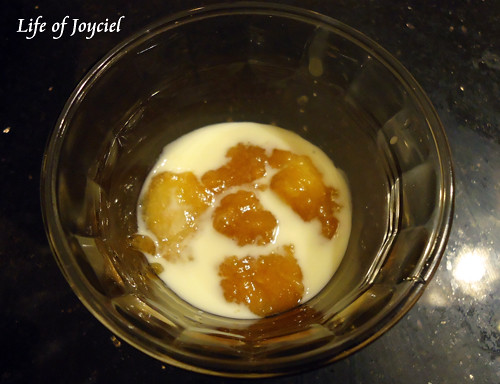
6. When everything is cooled down, add a little of the banana milk gelatin mixture and the caramelized bananas.
7. Add the rest of the banana milk to the cups evenly and put in the fridge until firmly set. Best to put it overnight.
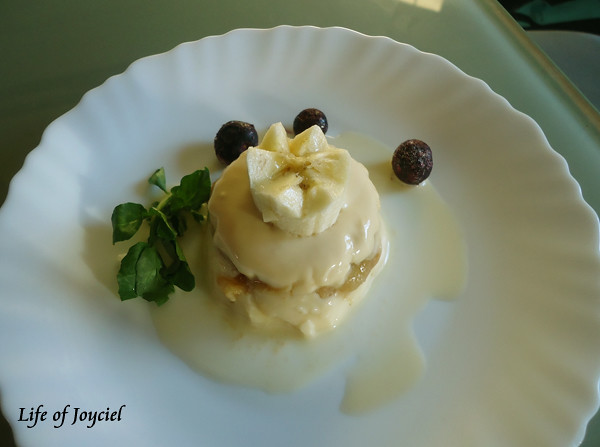
Panna Cotta

Plating
1. To unmold, heat up some water on a shallow pan (just a regular saute pan or something). Water must be lower than the height of your panna cotta cups.
2. When the water is boiling, put the panna cotta on it for 5 seconds.
3. Then using a small paring knife, cut around the edge of the panna cotta to loosen it from the cup.
4. Put a plate on top and flip upside down.
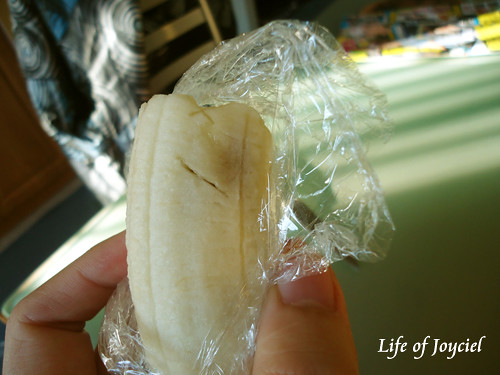
Banana Crown 1
Panna Cotta (top)

Banana Crown

1. Using a small paring knife, make an incision on an angle, push the knife to the center of the banana.
Banana Crown 2
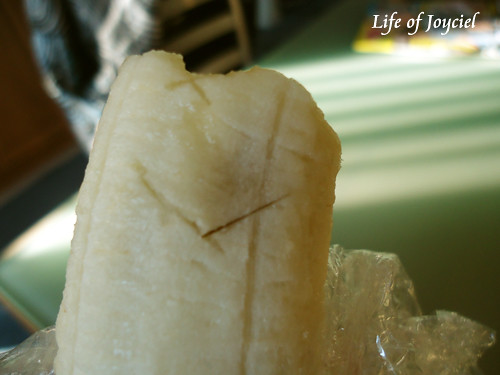
2. Make an other incision on the opposite angle (so it makes sort o a 'v').
3. Repeat that around the banana.
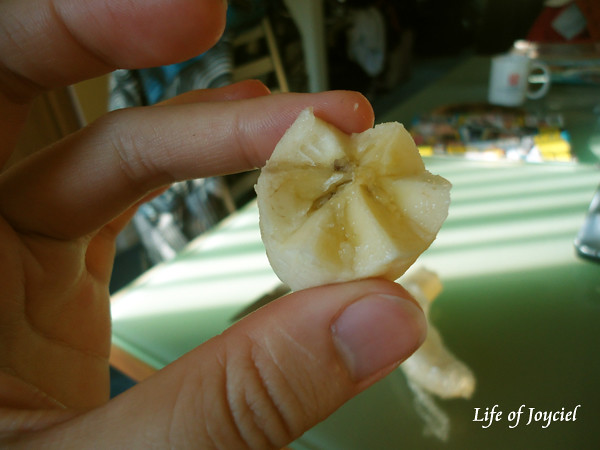
Banana Crown 3
Ta-dah!

Panna Cotta (Inside)

Enjoy!

Tuesday, December 6, 2011

Chorizo Madness: Eggplant Casserole, Miso Honey Bokchoy, Mashed Potatoes

Dinner

Chorizos are great! So much flavour is such a small package. It has a smokiness, really salty, and a bit spicy. Like a very condensed pepperoni if I have to compare it with something.

So it's a great enhancer and a great way to spice up a few dishes. So I used it for my eggplant and mashed potatoes.

Eggplant casserole, it is baked with kimchi and chorizo then topped with cheese until golden brown.
Miso honey bok choy, it is stir fried with butter and mixed in a miso and honey sauce.
Mashed potatoes, with a kick from the chorizos.

This serves three people.

Eggplant Casserole

Eggplant Casserole Plated

Ingredients:
Chinese eggplants - 3
Kimchi - 2 cups (by which I mean handfuls lol)
Chorizo - 1 stick (120g)
Kraft tex mex cheese mix (I can be trashy sometimes and it tastes good) - as much as you like
Cornstarch - 1 1/2 teaspoon

Instructions:
Eggplants
1. Cut the eggplants in half, (like so they're equal), then in threes.
2. Add some oil in the pan at medium heat and give some browness to the eggplants. (Only half of the eggplants are in that picture)
Fried Chorizo and Kimchi
3. Take the eggplants out, add a bit more oil to brown the chorizo (sliced), when there is some browned bits on the pan, add the kimchi and let the kimchi juice deglaze* the pan.
Braising Eggplants
4. When the kimchi is hot, add the eggplants, then add enough water till it's half way. Turn the heat to low then cover with a lid. Eggplants will shrink down so you don't have to worry that it's too little water. Rearrange the eggplants once in awhile so they all get submerged in the liquid at some time.
5. When all the eggplants are cooked, preheat the oven to 350.
6.make a slurry with the cornstarch and just enough COLD water to dissolve it (so like 2 teaspoons of COLD water) and add it to the liquid. Turn the heat back to medium and wait till the liquid thickens into a more saucy (like pasta sauce) consistency. If it doesn't reach to a consistency to your liking you can add more slurry.
7. Add the eggplants to a pan, should be fairly large since you don't want to stack the eggplants too much. (In fact mines was mostly just one layer of eggplants and than cheese lol) Top the thing off with cheese (don't go too crazy now...)
Eggplant Casserole
8. Put the pan in the middle rack for ten minutes, than turn the temperature to broil, put the pan on the top rack and wait till cheese turns all golden brown.

*Note: What is deglazing? Well when you heat something up on the pan, there will eventually be some sort of brown bits stuck at the bottom right? Well that's all flavour, adding some liquid and then using your spatula to lightly scrape the bottom will get it off the pan and mixed in the liquid, adding tons of flavour to it. If the brown stuff turns black you shouldn't use it though because that is just burnt. Also non-stick pans don't do this so when making a nice sauce for your steak or pork chop, always go for the cast iron or stainless steel or something.

Miso Honey Bok Choy

Miso Honey Bok Choy Plated

Ingredients:
Bok Choy - 1 bag (1 pound maybe? It's about the same in all Asian supermarkets)
Miso - 1 1/2 tablespoon (or to taste)
Honey - 1 1/2 tablespoon (or to taste)
Butter

Instructions:

1. Wash the bok choy by cutting the ends and submerging it in water. Then dry it off in a salad spinner.
Bok Choy Stirfry 1
2. Melt butter in a pan at high heat. Add the bok choy.
3. When the leaves are wilted, turn down to low heat, add a bit of water and cover till the stems are soft.
Bok Choy Stirfry 2
4. Turn it back to high heat, when only a small amount of water remains, add the miso and honey. Stir evenly. You can always change the amount of miso and honey to your liking. There's no screw ups in stirfrying! Well don't burn it...
5. When the sauce is to the consistency and taste you like. Take it off the heat and it's done.

I love stirfrys, so easy and so many ways you can really make it your own!

Mashed Potatoes

Mashed Potatoes Plated

Ingredients:
Russet Potatoes - 2 large
Chorizo - 1/2 stick (60g)
Milk - to taste
Salt and pepper - to taste

Instructions:
1. Peel and dice the potatoes, cut the chorizo in quarters (lik 4 long sticks) then slice into little pieces.
Cooking potatoes
2. Put the potatoes and chorizo in a rice cooker*, add water to 1/4 way and turn it on to cook. Check periodically to make sure there is enough water.
Mashed Potatoes with Chorizo
3. When the cooker is on 'keep warm' make sure the potatoes are fully cooked (if not just add a bit more water and put the button on cook again) then add the milk until the right consistency, season.

Note: If you don't have a rice cooker, just boil a full pot of salted water, add the potatoes. After 14 minutes, drain the water out and then add the chorizo and milk and stuff. It won't have as much chorizo flavour but it'll still be good!

So this was actually a really easy meal. The chorizo made something relatively simple and sometimes a bit boring (like mashed potatoes) and made it sound and taste more special.

Monday, December 5, 2011

Keeping Your Cabbage Undercontrol: Kimchi

One of my favourite things to keep in the fridge. Why? Well first of all it's really easy to make, and I'm all about the easy. Second of all it adds instant flavour to everything. Since lately I've been kinda lazy with the stock making I'll just add some kimchi to water ad add some meat and vegetables and call it a jjigae (Korean stew).

Kimchi

I used this site as reference but made some changes cause I didn't like the result as much: http://drbenkim.com/how-make-kim-chi.htm

Cabbage Kimchi

Ingredients
Napa cabbage - 1 kg (very large one or two regular ones)
Salt - 1 cup
Apple - 1 1/2
Asian Pear - 1 1/2
Yellow Onion - 1
Fish Sauce - two table spoons
Honey - 2 tablespoons
Garlic - 2 heads
Ginger - 1/4 cup
Korean hot pepper flakes (Gochugaru) - as much as you want

Note: To be honest, I eyeballed a lot of the ingredients because for the sauce it's really suppose to be to your taste but these are the ones I used.

Instructions:
Fresh Napa Cabbage
1. Cut the cabbage in half. With the end in tact, make cuts on the side like layers. Then from the top, cut vertically and then horizontally to make large rectangular pieces. Discard the ends. Basically cut it like how Gordan Ramsay is cutting into this onion: http://www.youtube.com/watch?v=TwGBt3V0yvc but you know...bigger.
2. Wash the cabbage by submerging it in water and then dry it off with a salad spinner. It's fine if there's water left after spinning it. In fact there should be some water. Put the cabbage in a big container. I used my stock pot.
3. Add the salt (so you needed some water left on the cabbage for the salt to stick to) and mix it thoroughly and leave it there for several hours. Mixing the cabbage once in a while.
4. After several hours, there should be a lot of liquid and the cabbage should be wilted but not mushy or anything. You know, like how the texture of kimchi is. If it takes more than 4 hours...you'll probably need more salt.
Kimchi Mixture 1
5. While the cabbage is wetting itself you make the mixture. Chop the ingredients up (minus the pepper flakes), like just a dice for the apple and pears and onions. Peel and slice the ginger, and peel the garlic. Puree them in a food processor for a bit of water. Like the consistency in the picture.
Kimchi Mixture 2
6. Add the pepper flakes to your heart's content! I like them very spicy so I added quite a lot, also flakes can come in mild and spicy so if you don't like spicy. You can buy mild flakes. Also it will sometimes say hot pepper powder but it'll look like flakes.
Fresh Kimchi
7. Now just mix the mixture a little bit at a time to the cabbage until all the cabbage is well coated
8. Put in the container with a lid. If you like fresh kimchi and in no need for really sour ones just put it in the fridge now. If you're like me and enjoy the really sour kimchi it'll speed up the process considerably by storing it in a dark cool place (like a cupboard not in the kitchen or your basement) for a day and a half before putting it in a fridge. Or you can put the cabbage in a large clay pot and bury it in a hole in the ground but I think the fridge might be easier.

So what can you do now? Well beside soups and stuff like that, you can also use it in stirfrys, kimchi pancake, top it on burgers etc...but those are another post!

If this kimchi recipe made your head spin I also love this woman's blog so I would recommend her recipe: http://www.maangchi.com/ she's great!