Anyways, one of my close friends who went abroad (or a few cities away) for a Frech program recently came back for a visit so what better way to send her off than with a batch of warm homemade cookies?
She loves all things chocolate and she loves almonds which is great cause that was kinda all the ingredients I had. So I decided to put my own twist on the chocolate almond cookie...which isn't really a thing...but it's a common pairing.
I also got a new camera that has like double the mega pixels!
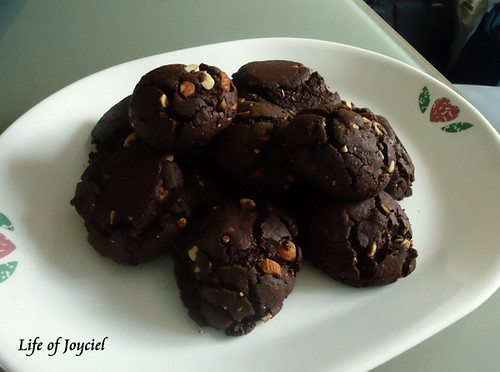
Chewy Chocolate Burnt Almond Cookies
Servings: 20 cookies
I'm going to separate the dry ingredients and wet ingredients because in this recipe you prepare them separately and just mix it together in the end.
Dry Ingredients:
All-Purpose Flour - 225g (uh, just measure one cup and take two tablespoons out it'll be about that?)
Cocoa powder - 75g (quarter cup and one tablespoon)
Salt - 1 teaspoon
Baking soda - 1 teaspoon
Almonds - 25 (I just guesstimated how much I needed though it's up to how much you like almonds)
Instructions:
1. First sift all the dry ingredients minus the almonds and put it aside
2. For the almonds, just cut it into small pieces (size is up to you, that's the good thing about cooking, it's really personal)
3. Turn on the stove with a pan on medium high heat, when the pan is hot, just add the almond pieces and stir it around a bit until the nuts get a more toasted taste, if some pieces get burnt it's okay.
Note: I used all purpose but if you want to up the chewiness more you can use bread flour because of the higher gluten content, not gluten is the substance that gives bread that chew.
Wet Ingredients
Brown Sugar (sugar always counts as wet ingredient in baking for some reason) - 150 grams (1/2 + 1/8 of a cup...THIS IS WHY I ALWAYS ADVOCATE SCALES!! It's only twenty dollars for mine and I bet there's cheaper ones cause mines digital.)
White Sugar - 50 grams (1/5 of a cup)
Eggs - 2 large
Butter - 100 grams (one stick), browned
Chocolate Chips - 65 grams (about one cup bit higher than level)
Instant coffee - 1 1/2 tablespoons (you can add more but I think this is a good amount that doesn't over power the chocolate but gives it something extra)
Cream - as much as you need (I'll explain later)
1. Brown the butter by melting it in a pan until the milk solids (the white foamy stuff) browns, watch very carefully because once it starts browning it gets black and then it's ruined.

The colour should be like the amber at the middle, there were lighter layer of stuff on top but overall it was like the darker colour, the froth was just covering it.
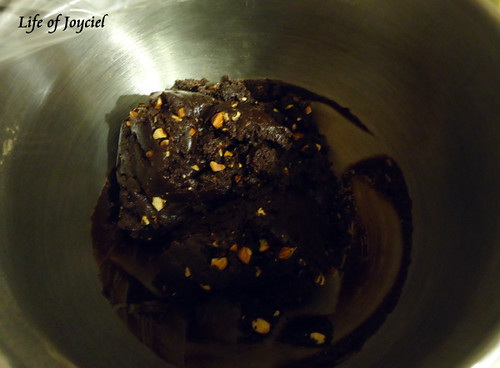
2. When the butter is brown add the chocolate to the pan until thoroughly melted.
Note: Why so much brown sugar? Because brown sugar has molasses, which is sticky and liquid which makes the cookies more moist and chewy. I also used some melted chocolate so it'll give more moisture. And why browned butter? BECAUSE IT'S DELICIOUS! Brown butter just have a much better nutty aroma which matches well with the almond's nutty flavour.
Combining
1. Using a whisk attachment (or a regular whisk using the power of your hands!) mix the eggs and sugar until it looks a bit creamy and fluffy, add the melted chocolate and brown butter mixture.
2. Switch to a paddle attachmennt (disregard this if you don't have a stand mixer) and slowly add the flour and in small batches, scrape down the bowl when neccessary.
3. The batter should be firm but malleable but not too dry, it should be like mouldable chocolate, you should be able to shape balls with it. If it's too dry add a bit of cream until a nice consistency.
4. Chill the dough for 2 hours.
5. Pre-heat the oven to 375, put one rack on the bottom and one on the top.
6. Measure the dough in 42g or 1.5 ounce portions (like a bit smaller than a golf ball)
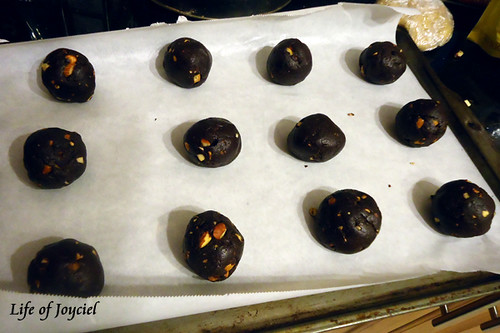
7. Round them up into balls and put them on a piece buttered parchment paper or silpat. DON'T PRESS THEM!!! (You should put them in the oven when they look like in that above picture)
8. Put them in the oven at the bottom for 8 minutes, than turn them around and put them on the top rack for 7 minutes.
9. Cool down for five minutes before eating.
Note: Chilling the dough makes all the difference, especially since you melted the butter when you put it in the oven right away the fat will melt quicker causing the cookie dough to slide and spread more, making them more thin and crispy rather than thicker and chewy.
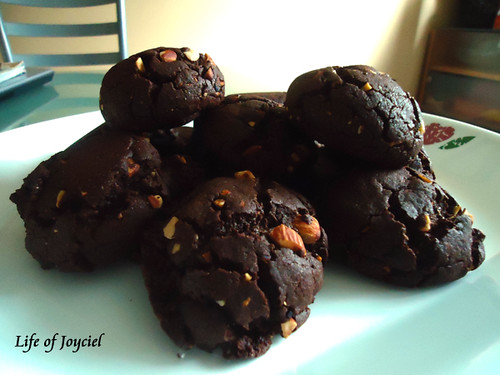
This is one of my favourite recipes, my boyfriend ate a few and he also loved this cookie, he declared it "The Best Cookie He Ever Ate!". I think taking time to do each step makes all the difference. Toasting the almonds so they are more fragrant, browning the butter accentuates the nuttiness, the coffee gives it more of a well rounded flavour and nice bitterness so the cookie isn't too cloying sweet. Also the chewiness of the cookie and the crunch of the nuts gives a nice balance of textures.
Visit my tumblr: http://lifeofjoyciel.tumblr.com/ where I not only talk about food I also do a lot of other ranting on other bunches of stuff!
+icon.jpg)
hello! this recipe looks fabulous! does it still taste as good and chewy the next day? how did u preserve the freshness of the cookie, if u didn't eat it all within one day!? (>.<)...
ReplyDeleteOops at the late reply, but I just put it in a ziplock bag usually, it still pretty chewy afterwards.
ReplyDelete